25 Aug 13
00:11

Mac Dictionary Services API Tease

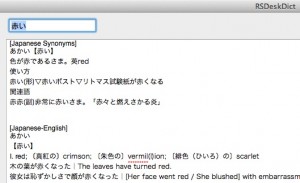
Basic lookup working

I am a big fan of Dictionary.app. It’s pretty handy for English, but what makes it really shine is that it has a zomg-amazing Japanese dict called Daijisen. What’s more, with 10.8 Apple threw in German, French, Spanish, and Chinese dictionaries as well. However, after getting used to the app, while still using it, I have decided that it sucks. I should clarify. The dictionary content that it has is great. But the app itself is lacking some features that would make it so much more useful. I want search history that goes beyond a single app launch, and an interface for seeing what words I looked up when. I want to be able to export this list so I can make flash cards. I also want to be able to search by words other than by a ‘starts-with’ scheme, such as ‘contains’ or ‘ends with’, like many online dictionaries have.

For a while I just assumed there was no easy way of using the content the mac dictionary app uses. Then I found out about the mac dictionary services API, which looks promising at a glance.

I created the basic lookup pretty quickly while on the BART commute to work and back. But it became apparent after some tinkering that the existing API (which has only two functions for word lookup) is entirely incomplete. You can look up a string, and get a definition back from the same dictionaries that Dictionary.app uses. However, you can’t specify which dictionary, or which entry within a dictionary (e.g. for a word that has multiple definitions). This means you only will the first entry of the first dictionary that gets hit. So I decided to spend a good part of today trying to see what could be done about this.

I came across one or two or three interesting posts that showed some private API off. Most of these were for simple CLI programs, or for building their own dictionary. And used private calls such as DCSRecordCopyData() and DCSCopyAvailableDictionaries(). DCSCopyAvailableDictionaries allowed me to access specific dictionaries, and used in conjunction with DCSGetTermRangeInString and DCSCopyRecordsForSearchString, I was able to generate a reasonable list of candidate DCSRecordRefs entries from a single input word. The only thing missing was the definitions for each DCSRecordRef.

I wanted to make this dictionary for my Japanese studies. In Japanese, there are tons of homonym and homophones depending on if you use write the word with kanji or not. I didn’t see a function from my googles that would show the word listing, but doing an NSLog(@”%@”, record) on an example search for ‘いる’ showed some info about the DCSRecord structure:

lldb output:
{key = いる, headword = いる【射る】, bodyID = 111081}
{key = いる, headword = いる【要る】, bodyID = 104584}
{key = いる, headword = いる【居る】, bodyID = 163639}

It looked like the ‘bodyID’ or ‘headword’ field of DCSRecordRef had the most specific information about the result. So I went into the framework and searched for symbols of functions that might do the trick:

cd /System/Library/Frameworks/CoreServices.framework/Versions/A/Frameworks/DictionaryServices.framework
nm -gU DictionaryServices|grep DCS
0000000000007b06 T _DCSActivateDictionaryPanel
000000000000914d T _DCSCopyActiveDictionaries
000000000000916f T _DCSCopyAvailableDictionaries
[...]
0000000000007e07 T _DCSRecordCopyData
0000000000007e1e T _DCSRecordCopyDataURL
0000000000007e63 T _DCSRecordGetAnchor
00000000000076ef T _DCSRecordGetAssociatedObj
0000000000007e4c T _DCSRecordGetDictionary
0000000000007ebd T _DCSRecordGetHeadword
0000000000007e91 T _DCSRecordGetRawHeadword
0000000000007f04 T _DCSRecordGetString
0000000000007e35 T _DCSRecordGetSubDictionary
0000000000007e7a T _DCSRecordGetTitle
0000000000009181 T _DCSRecordGetTypeID
00000000000076d9 T _DCSRecordSetAssociatedObj
0000000000007ea8 T _DCSRecordSetHeadword
000000000000878a T _DCSSearchSessionCreate
[...]

The second entry for 棺 should be ひつぎ

There were about a 100 or so symbols or so that Apple didn’t feel like sharing via docs. I tried a few combinations, but it looks like DCSRecordGetTitle or DCSRecordGetRawHeadword produced the best strings for use with DCSCopyTextDefinition. This solves the homonym problem for the most part. However, this did not work at all with heteronyms (words that are spelled the same, but pronounced differently), since the headword/display title would be the same. For example, for the input 棺 I need the definitions for both 棺 read as ‘kan’ and 棺 read as ‘hitsugi’, but this method would give me two definitions for ‘kan’ instead. Eventually I gave up. I hope someone else figures this out. I put the intermediate result up on github. Let me know if you make any progress.

On iOS it goes without saying that you should probably avoid using private APIs, since the main means of distribution is through apple. On the mac distributing an app yourself is still viable, and thus you can use private APIs to your heart’s content. However, because the non-documented but exported symbols do not provide function signatures, it’s pretty much just a tease unless you want to spend a lot of time to figure out what each method takes. After googling symbol names, it seems dictionary services are relatively unexplored. But I’m mostly interested in this for making my hobby dictionary that I can nerd out on and add lots of obscure features to while using the apple-provided dictionaries.

09 Jun 13
23:13

Surreal Warp Nightmare – BaconGameJam 05


Surreal Warp Nightmare


BaconGameJam is one of several game jam/rapid development challenges like Ludum Dare and One Game a Month. The last jam took place over the weekend. The theme of “Lights Out” was announced friday night, and teams had 48 hours to design and implement a complete game. I signed up as a team after finding team members via a reddit post I made. The finished game is available here for mac/linux/win/android, including source on my github.

This was my first game jam, so I wanted to shoot for a pretty low target in terms of design. I saw previous jam results where many games were unplayable or not submitted, and this got me worried. Before the jam began I was already leaning towards a just a simple click control and a game mechanic that would wrap around it, because I wanted to be sure to finish.

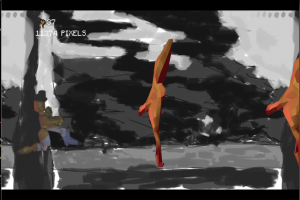
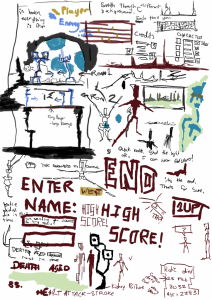
concept/idea art by William Mckee

We brainstormed around the ideas of energy conservation, curfew, die hard, puzzles/game of life, and ultimately ended up designing a runner with a warp between color / grayscale on click. Enemies and good things like bacon would be able to interact with the player on either the color or grayscale background, and as the game progresses, they become less visible from the other warp background.

I had several motivations for joining this game jam. For one, it’s community interaction and as a SOHO whatever it feels good to work with others. Also, working with others is something I want to get better at. Working with a team I am comfortable and productive with is something I dream about. To get there this means I need to work with lots of people.

I also was interested in the challenge aspect. Not the competitive aspect, since this is my first jam, but rather the technical ability to prototype and design rapidly. Sometimes I struggle with longer term projects because I didn’t do enough prototyping and quick development. A 48 hour jam effectively forces you to identify critical design elements and prune the things that aren’t working. This form of greedy design is something that I have too often passed by because it does feel ‘greedy’; but now want to look at it as a tool for overall design rather than a restrictive philosophy.

There was also the technical challenge. These jams tend towards web apps because they are cross platform. However I do desktop and mobile apps, which means compiling to many different platforms and all the headaches that come along with that. However, this is something I want to become more fluent in, since lately I am using cocos2d-x, and the desktop cross platform ability is a major benefit of it that is often unused. BGJ actually gives you an additional day to package your game for additional platforms, but I ended up doing it all before the deadline, compiling a cocos2d-x project to mac/win/linux/android. Fixing cross platform stuff (microsoft’s C compiler oddities or GLSL differences) probably took 30% of the time, which is not so ideal, but now I’ve learned how to make things work with cocos2d-x on each.

Also, I like the idea of being able to learn some new skill with a game jam. I have been wanting to play around with GLSL shaders for a while but despite working with fixed-pipeline OpenGL, I never got around to the programming pipeline. The game jam was a perfect time to dive in. So the game has 4 different shaders from simple greyness/glow shaders, to give a tv-like channel switch effect on the warp, to texture deformation to simulate animation on static sprites. It was pretty educational and I can’t wait to use this on my next iOS game.

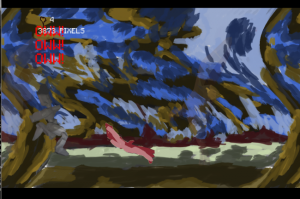
the warp swirl effect is done via a GLSL shader

Overall, I’m happy with the result. The game is playable and provides some basic fun. Although it’s not going to win any awards, I finished it, and I have a solid point of reference for what I can do in 48 hours for my next jam or prototype. I’m glad I worked on it as a team because the art (by William Mckee) and music (by Grant Matthews) make the game experience much more pleasant, and it was great to toss around ideas and get excited with real people. This was a really good refresher that has given me some new energy and perspective on my current projects too. Looking forward to the next one. If I have time later maybe I’ll do a post moretem on the cocos2d-x/C++ source/technical details and pitfall avoidance strategies I used, but if you’re interested in cocos2d-x alone maybe take a look at the github.

31 Mar 13
21:39

Cocos2D-X: Creating an iOS/android dual-platform project

I develop iOS apps. However, the first smartphone I had was an android device. I like open-source projects and bought it over the iPhone for idealogical reasons more than anything else. As a user, the android experience was okay, although iOS clearly had the apps and the polish. But when it came down to actually needing to make a surviving wage I decided to switch to iOS.

Lately, in podcast and forums, as well as third-party developer support tools, I’ve seen a comeback in indie iOS game developer interest for android, for whatever of the many reasons there might be from iOS over-saturation to app store visibility to the rising android markets. Especially for games. Some people are porting their obj-c projects to java. Some people are developing in Unity for the ability to deploy to both platforms. Unity seems to be great in that regard, but although free for PC/Mac deployment, it can cost a bit to deploy on iOS/Android at $400 a platform. Then there are the open-source “write once, run everywhere” solutions, for games such as libgdx and cocos2d-x. This is ironic because the slogan is from sun, but due to the walled garden nature of the walled garden, the term applies better to cocos2dx client code then the android java sdk.

cocos2d-x client code is in c++, which is my native tongue. Sweet. I had also played around a bit with cocos2d in obj-c and it was okay. So I decided to give cocos2d-x a shot to give android a second chance. Also you can supposedly deploy to windows 8 mobile and get $100 (note to self:not sure if joking).

Until recently I was one of the active contributors of Audacity, which is built using wxWidgets. For my last few sonfication/noisemaker projects I used Open Frameworks. wxWidgets and Open Frameworks are great because they let you write c++ code once and deploy on mac/windows/linux. But setting up the first project to work with each platform is a pretty big barrier for pretty much every cross-platform framework. This is just the nature of the beast – namely the inherent complexity of cross platform development.

There are a few guides out there on setting up your build for cocos2d-x for iOS and android. There are great guides, but they are about a year old, and so they didn’t work without modification, although they do get you most of the way. The main place to look was the ever-present raywenderlich.com’s cocos2d-x tutorial and it’s prerequisite eclipse/android tutorial. Then there was gamit.ro’s cocos2d-x tutorial, which leaves out the eclipse details but goes into some important stuff about android makefiles that raywnderlich.com’s doesn’t. Lance Gray from the cocos2d-x forums also mentioned there’s a nice guide at paralaxer.com that shows how to integrate iOS/android plus win. Anyway, I’m writing this as a supplement to those guides, and as a thanks to their authors as well as the various forum posts that allowed me to get the solutions faster than I could on my own.

In all, I think it took me about a day and some change to get everything set up the way I wanted it, even with these guides. All of the waiting had to deal with the install and setup of cocos2d-x’s android project setup, OpenGL ES 2.0, and trying to use a shared project directory external to the cocos2d-x root for source control management reasons. That being said, if you just want to try it and already have XCode working with iOS, you can easily follow the guides to get your cocos2d-x project setup in minutes. I’ll try to describe what I stumbled on, and maybe it can save you some time.

update – Instead of doing all of the 10 steps listed below, you should check out this python script that creates a shared project directory for ios/android/mac/win.

The script came out recently so I didn’t hear about it, but it should save a lot of time. You’ll still need to install android ndk/sdk, set up the environment variables, as well as the emulator trick I mentioned, but it’ll save you steps 6-10, and the necessary merging of the projects that I don’t cover yet. The script is at tools/project-creator/create_project.py, in the cocos2d-x root. The script is very simple, and creates all the projects in one line – Although I had the NDK_ROOT missing error I describe below. You can still use this guide – steps 1, 3, 4, 5 are still what you need to do for android sdk installation, and the rest might be handy for debugging errors.

0. Assumptions

I started with XCode/iOS environment already set up, so I’m not covering that. You should be able to run an app in the iOS simulator before starting here.

1. Get Cocos2D-X

You can download the latest stable (2.1.2 as of march 31) from their website. I should also note that alternatively, they also have a github repo that has the stable releases tagged. I forked this on my own github account so I can make changes and submit them. After cloning your fork you can checkout the stable tag). If you don’t know what I’m talking about it’s best to just use the website zip download.

The zip extracts to a directory named cocos2d-2.1rc0-x-2.1.2 (if you used github it defaults to cocos2d-x). Put this somewhere. I put it in my source control management folder (e.g. /Users/mchinen/scm/cocos2d-x). The location of this folder will be used in the future many times, referred to as the cocos2d-x root or as the variable $COCOS2DX_ROOT.

2. Set up Cocos2D-X to work with XCode

Go to the terminal, and cd to the cocos2d-x root and run install-templates-xcode.sh. Example

cd ~/scm/cocos2d-x
sudo ./install-templates-xcode.sh

This will install some xcode templates.

2.1 Test the XCode template
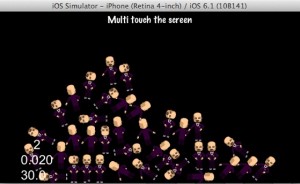
Rigid-body dancers endure awkward positions to make pyramid


Open XCode and go to the File Menu’s create new project. I wanted to use the chipmunk physics engine so I picked cocos2dx_chipmunk. You can pick the standard cocos2dx or box2d if you like, but just remember when you create your android project you will need to create the same type of physics engine.

I called my project ‘pet’ and put it at ~/scm/pet.

I was able to build and run in the simulator without any problems. I will note that there about 7 deprecated function warnings. Since I picked chipmunk it creates a scene which spawn lovely bald dancer sprite rigid bodies.

So that’s it for iOS setup, really. You now can modify and add cpp files as you like.
As I mentioned, the iOS setup is fairly painless. 95% of my time was spent on integrating android over the next few steps.

3. Eclipse setup

The (non cocos2d-x) android/eclipse raywenderlich.com tutorial I mentioned is a bit dated, and you only need one step from it for eclipse set up now in a bundle. Download the android sdk, which now includes eclipse+ADT plugin. There are also ways to expand an existing eclipse install (basically this follows the raywenderlich tutorial), but you can also just have two installs of eclipse (I have three installs of XCode on my computer).
The download comes as a zip and I extracted it to a folder in my home directory I use for non source control frameworks called ‘localframeworks’. So for me, the path to the android sdk bundle is /Users/mchinen/localframeworks/adt-bundle-mac-x86_64-20130219. If you ls it you’ll see it has two directories, one for eclipse, which contains the actual eclipse executable + adt, and another directory called ‘sdk’. When referring to the android sdk root, it’s this sdk directory, and not the parent. I suspect if you download the non-bundled (minus eclipse) version the directory structure is one less, with the sdk sitting on the top level.

4. Install C++ for eclipse

Go ahead and open the Eclipse application in the eclipse directory of the android sdk bundle.
If you are new to eclipse it will ask you about a workspace location. You can pick any user location for this – it won’t really affect the tutorial and does not determine the root directory of your android project. For example, I selected ~/localcode/. The default in ~/Documents is fine too.

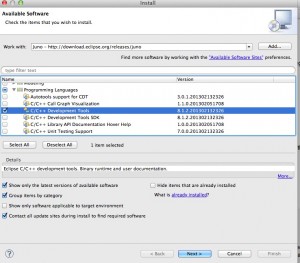
Now once eclipse loads go to the help menu, and select install new software. Select ‘Juno’ (or whatever the current build name of eclipse is), and then check C/C++ development tools. Click next and install it. FWIW my screen didn’t match the raywenderlich tutorial, and had one less item installed. Here’s a screenshot:
5. Install the android NDK

Download it (you want the 64 bit one). I extracted it and put it in the same localframeworks directory that I put the android SDK in. So the location of android NDK for me is /Users/mchinen/localframeworks/android-ndk-r8e. This will be referred to as $NDK_ROOT in the future.

6. Create the android project

Remember how the XCode project had templates that would configure and create the xcode cocos2d-x project for you automatically? It’s likely that some kind soul will make them some day but for now that doesn’t exist for eclipse yet. Fortunately for you, there is a (command-line) shell script that can do this. It’s called create-android-project.sh and it’s in $COCOS2DX_ROOT.

Remember how you could pick wherever you wanted to place the objective-C project? You don’t have that choice anymore either. To use the script, you need to cd to $COCOS2DX_ROOT and run the script there – calling it externally yields an error. This is not ideal if you want to use source control management like git, but we can fix this later at the cost of some minor pain.

First, you need to create some shell environment variables that the script uses. You can run these directly in the terminal and the variables will exist for the terminal session, but I like to put them (append them) in ~/.bash_profile.

export ANDROID_NDK_ROOT=~/localframeworks/android-ndk-r8e
export COCOS2DX_ROOT=~/scm/cocos2d-x/
export NDK_ROOT=$ANDROID_NDK_ROOT
export ANDROID_SDK_ROOT=~/localframeworks/adt-bundle-mac-x86_64-20130219/sdk
export PATH=$PATH:$ANDROID_NDK_ROOT

Now that you have the shell variables set, we’re ready to run the script. The usage of the shell script is

./create-android-project.sh [-b|--box2d] [-c|--chipmunk] [-l|--lua]

So to create an android project that links to the chipmunk framework, you should append the -c flag.
You’ll be prompted for a few things like your package path (you can use your intended iOS bundle. For example, ‘com.michaelchinen.pet’). Pick a target SDK which is (I used 2.2), and then lastly choose the name of your project (I used ‘pet’.

For completeness, this is my truncated output example from the script:

mcair:cocos2d-x mchinen$ ./create-android-project.sh -c
use global definition of NDK_ROOT: /Users/mchinen/localframeworks/android-ndk-r8e
use global definition of ANDROID_SDK_ROOT: /Users/mchinen/localframeworks/adt-bundle-mac-x86_64-20130219/sdk
using chipmunk
Input package path. For example: org.cocos2dx.example
com.roughsoft.pet
Now cocos2d-x supports Android 2.2 or upper version
Available Android targets:
----------
id: 1 or "android-7"
     Name: Android 2.1
     Type: Platform
     API level: 7
     Revision: 3
     Skins: HVGA, QVGA, WQVGA400, WQVGA432, WVGA800 (default), WVGA854
     ABIs : armeabi
----------
id: 2 or "android-8"
     Name: Android 2.2
     Type: Platform
     API level: 8
     Revision: 3
     Skins: HVGA, QVGA, WQVGA400, WQVGA432, WVGA800 (default), WVGA854
     ABIs : armeabi
----------
id: 3 or "android-10"
     Name: Android 2.3.3
     Type: Platform
     API level: 10
     Revision: 2
     Skins: HVGA, QVGA, WQVGA400, WQVGA432, WVGA800 (default), WVGA854
     ABIs : armeabi, x86
----------
[...]
id: 13 or "android-17"
     Name: Android 4.2.2
     Type: Platform
     API level: 17
     Revision: 2
     Skins: HVGA, QVGA, WQVGA400, WQVGA432, WSVGA, WVGA800 (default), WVGA854, WXGA720, WXGA800, WXGA800-7in
     ABIs : armeabi-v7a
input target id:
2
input your project name:
pet       
Created project directory: /Users/mchinen/scm/cocos2d-x/pet/proj.android
Created directory /Users/mchinen/scm/cocos2d-x/pet/proj.android/src/com/roughsoft/pet
Added file /Users/mchinen/scm/cocos2d-x/pet/proj.android/src/com/roughsoft/pet/pet.java
Created directory /Users/mchinen/scm/cocos2d-x/pet/proj.android/res
Created directory /Users/mchinen/scm/cocos2d-x/pet/proj.android/bin
Created directory /Users/mchinen/scm/cocos2d-x/pet/proj.android/libs
Created directory /Users/mchinen/scm/cocos2d-x/pet/proj.android/res/values
Added file /Users/mchinen/scm/cocos2d-x/pet/proj.android/res/values/strings.xml
Created directory /Users/mchinen/scm/cocos2d-x/pet/proj.android/res/layout
Added file /Users/mchinen/scm/cocos2d-x/pet/proj.android/res/layout/main.xml
Added file /Users/mchinen/scm/cocos2d-x/pet/proj.android/AndroidManifest.xml
Added file /Users/mchinen/scm/cocos2d-x/pet/proj.android/build.xml
Added file /Users/mchinen/scm/cocos2d-x/pet/proj.android/proguard-project.txt
Resolved location of library project to: /Users/mchinen/scm/cocos2d-x/cocos2dx/platform/android/java
Updated project.properties
Updated local.properties
Updated file /Users/mchinen/scm/cocos2d-x/pet/proj.android/proguard-project.txt

This then creates a directory called pet within the cocos2d-x directory. If you open it you should see another directory called pet, as well as a very important directory called proj.android. This directory is kind of like your xcodeproj file, except it contains a lot more things including build output.

7. Build the android project.

If you cd to the proj.android directory, you can then build the project by running the build_native.sh script:
Here’s what I got (middle truncated, again)

cd ~/scm/cocos2d-x/pet/proj.android
./build_native.sh

NDK_ROOT = /Users/mchinen/localframeworks/android-ndk-r8e
COCOS2DX_ROOT = /Users/mchinen/scm/cocos2d-x/pet/proj.android/../..
APP_ROOT = /Users/mchinen/scm/cocos2d-x/pet/proj.android/..
APP_ANDROID_ROOT = /Users/mchinen/scm/cocos2d-x/pet/proj.android
Using prebuilt externals
make: Entering directory `/Users/mchinen/scm/cocos2d-x/pet/proj.android'
Compile++ thumb  : game_shared <= main.cpp
Compile++ thumb  : game_shared <= AppDelegate.cpp
Compile++ thumb  : game_shared <= HelloWorldScene.cpp
[...]
StaticLibrary  : libchipmunk.a
Compile thumb  : cpufeatures <= cpu-features.c
StaticLibrary  : libcpufeatures.a
SharedLibrary  : libgame.so
Install        : libgame.so => libs/armeabi/libgame.so
make: Leaving directory `/Users/mchinen/scm/cocos2d-x/pet/proj.android'

So at the end you can verify that chipmunk is being included in the build.
Great.
We’re ready to use this project in eclipse.

8. Configuring the eclipse project

Go to Eclipse’s File Menu->New->Project.
Then select Android Project from Existing Source in the next dialog.
After that you will be prompted to point to the existing source.
You want to point to the proj.android directory as in this screenshot.
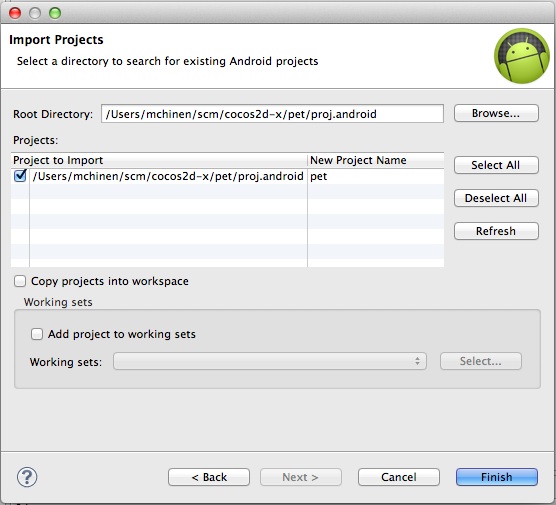
After this pick an android target in the next dialog. I chose 2.2.

This creates a project in eclipse. Unfortunately, mine had errors that said “Cocos2dxActivity could not resolve to a type”.
I’m not sure what the best solution is, but here’s what I did. We need to get the Cocos2dxActivity stuff into our workspace, but stay outside of the pet project. So go to File->Import… and pick “Android->Existing Project into workspace”. Then choose the directory at $COCOS2DX_ROOT/cocos2dx/platform/android/java.
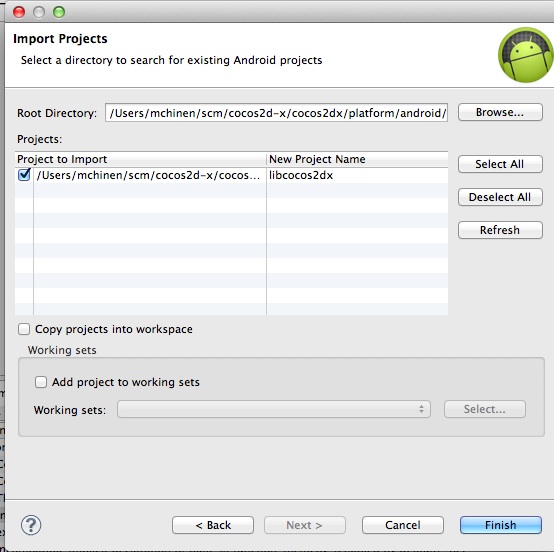
Now you have two projects in your workspace, pet, and the cocos2dx java libs in a project called libcocos2dx. You need to add a reference so the pet project knows to look at the cocos2dx java files. To do this, right click on the pet folder in the package explorer in eclipse, and select Properties. Then go to Java Build Path->Projects->Add… and select the libcocos2dx. This should fix the errors in the pet project, meaning that you’re ready to build and run on a device.
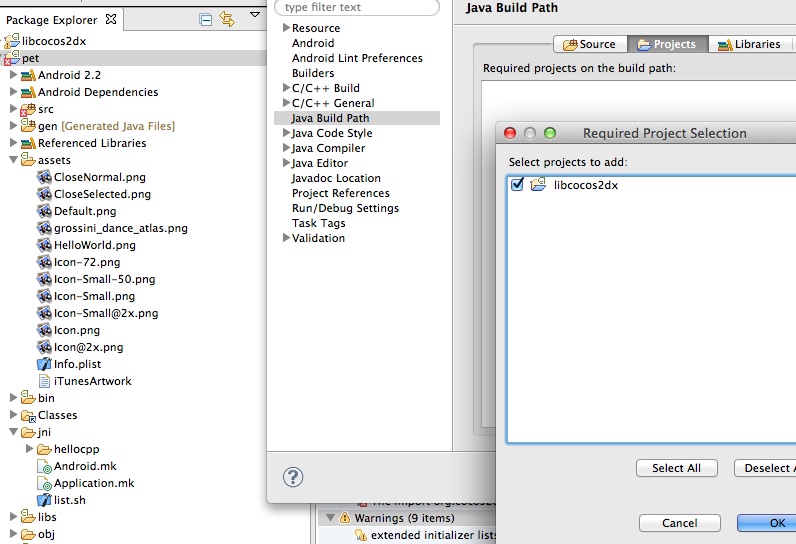
Note – You can fix this error by using the ‘link source folder’ option instead, and it will work, but I think this incorrect – please comment if you know for sure.

So you’re ready to run. At this point using cocos2dx 2.1.2, you still can’t run in the emulator because there are issues with OpenGL ES 2.0. But if you have a device that supports it, you should be good to run after hitting the play button and selecting the device. I busted out my 4 year old HTC Hero, flashed to android 2.3, and was hoping for something, but it just doesn’t support ES 2.0. Also, as important as it is to test on the device, the emulator can be a good way to get an idea of how your game deals with whatever resolutions you don’t have devices for. So I had to get the simulator working.

This thread describes how to do it. So if you need emulator support, you need to edit one of the java files in the libcocos2dx project. The patch code on the forum is missing some includes, so here’s the diff from my github that shows how to modify the file.
The file you need to edit is cocos2dx/platform/android/java/src/org/cocos2dx/lib/Cocos2dxActivity.java

 
@@ -27,9 +27,11 @@
 import android.app.Activity;
 import android.content.Context;
+import android.os.Build;
 import android.os.Bundle;
 import android.os.Message;
 import android.view.ViewGroup;
+import android.util.Log;
 import android.widget.FrameLayout;
 
 public abstract class Cocos2dxActivity extends Activity implements Cocos2dxHelperListener {
@@ -139,6 +141,10 @@ public void init() {
         // ...add to FrameLayout
         framelayout.addView(this.mGLSurfaceView);
 
+        // Switch to supported OpenGL (ARGB888) mode on emulator
+        if (isAndroidEmulator())
+           this.mGLSurfaceView.setEGLConfigChooser(8 , 8, 8, 8, 16, 0);
+
         this.mGLSurfaceView.setCocos2dxRenderer(new Cocos2dxRenderer());
         this.mGLSurfaceView.setCocos2dxEditText(edittext);
 
@@ -150,6 +156,19 @@ public Cocos2dxGLSurfaceView onCreateView() {
       return new Cocos2dxGLSurfaceView(this);
     }
 
+   private final static boolean isAndroidEmulator() {
+      String model = Build.MODEL;
+      Log.d(TAG, "model=" + model);
+      String product = Build.PRODUCT;
+      Log.d(TAG, "product=" + product);
+      boolean isEmulator = false;
+      if (product != null) {
+         isEmulator = product.equals("sdk") || product.contains("_sdk") || product.contains("sdk_");
+      }
+      Log.d(TAG, "isEmulator=" + isEmulator);
+      return isEmulator;
+   }
+
   // ===========================================================
   // Inner and Anonymous Classes
   // ===========================================================

After that, you’re almost there. Open the android device manager in the window menu of eclipse.
Click New…, then create a device. I created a galaxy s3 on 4.0. The main thing is you click the use host GPU button. Without this, the app would just crash. Here’s what my device config looks like:
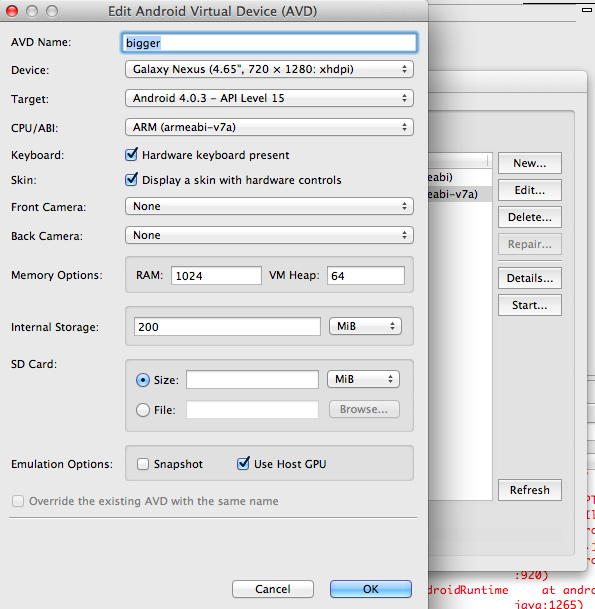
After setting this, run, and you should see a cocos2d logo and fps. Note that it isn’t the same as the iOS one, but at least something is on the screen and not crashing.

9. Convert to C++ Project

What remains to be done is to convert the android project to C++ for convenience, and then to merge it into the iOS project. You don’t really need to convert it, since you already have a running application, but this will make it so you can stay in eclipse and don’t need to switch to the terminal to build the C++ each time you make a change.
Ok, honesty time. It’s been a few hours since I started writing and I’m getting lazy now, so you can follow the raywenderlich.com guide to convert to C++, but I will note I hit an error after creating the C++ project where building would fail with a “Please define NDK_ROOT”
Here’s how to do that:
right click on the project->Properties->C/C++ Build->New variable.
For the name use NDK_ROOT. For the value use ${HOME}/localframeworks/android-ndk-r8e
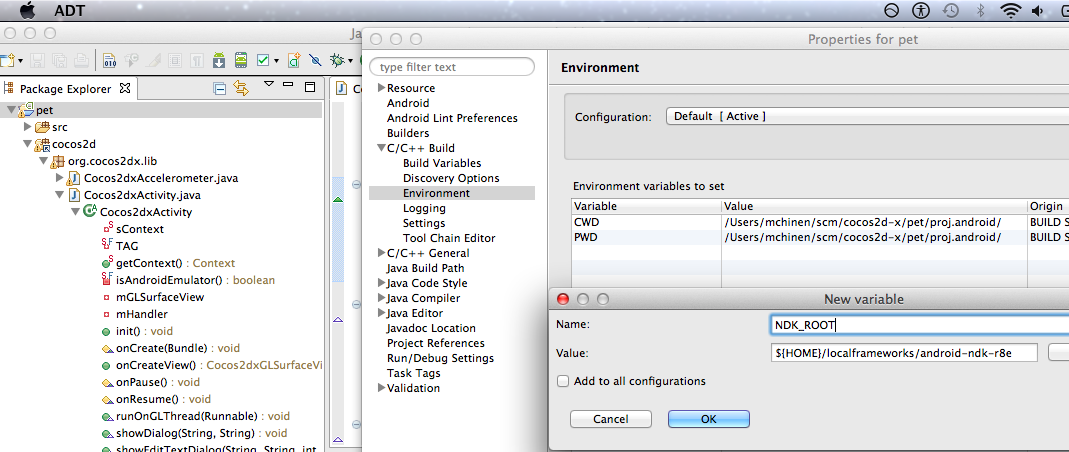


And all should build and run again.

10. There is no 10

After that you can follow the other tutorials on how to merge the projects. I’ll note that the raywenderlich one doesn’t actually fix the issue of having two unrelated directories, with the android one inside of the cocos2d-x directory.
I fixed this using a different method so that I could have both projects in one directory. Originally I planned to include that as well, but my time spent on blogposts is more than up, but maybe if there’s interest I’ll post another update on this. For now I need to get back to actually using the framework!

One other note that

03 Dec 12
23:07

1st year impressions of iOS game development

Always: Next game comes out soon

I moved to Japan in June to do iOS programming and game development. Not for a company or even a contract job. I just did it because I liked Japan and could see myself working there. There are other places that I like, but in the end Japan seemed the most attractive to me. I’m only midway in starting this adventure, and at the risk of sounding like /r/firstworldproblems and also like I’m giving advice from a position of no authority, here are my thoughts on some of the challenging points I’ve seen so far.

The main reason to write this post is to get a snapshot of what has helped, and what I am struggling with as a result of my decision to do iOS game dev as opposed to joining a company.
There are many posts out there on success, but very few post mortems and even fewer midway blogs that have the same level of detail. I am so greatful to those posts because helped me get a grasp on what I would be dealing with, which is a lot more than I expected.

0. Money

If you’re going to do iOS dev there’s no reason you can’t just start on top of your existing job during your downtime, provided you can commit 10-20 hours a week. However if you’re going all in you’re going to need some cash to burn. Some people get funding through loans, family/friends, or VC firms, but these were all to scary for me. Using your hard earned money to live on while you develop apps is also pretty scary, but it has the advantage of feeling like you are still in control. Fortunately, after you have the hardware there isn’t too much costs besides your basic living cost if you plan to work from home. In the states if you budget right and know how to cook you can probably live on $12 – 20,000/yr depending on how you do it. In Japan I’m on par for the upper range of that. I’ve found it important for once having decided your budget, to figure out your wiggle room and not be overly stingy. Remember that sometimes it is also necessary to treat yo self. Also to note – I’m doing most things myself which really helps keep costs to a minimum, but I have a budget for art/design as well.

1. Finding a place to call SOHO
Despite being a largely unsocial person, I am still greatly affected by my social environment. Both consciously and subconsciously, I try blend in and soak up the surrounding culture. On the outside my appearance varies by location as well. I wore T-shirts and shorts in Hawaii, acid-washed jeans with hoodies in Seattle, and blazers with striped pants in Tokyo. This isn’t so much about fashion as it is an external social effect. I used to see this as ‘fitting in’ but lately I’ve come to see this phenomenon in a more positive light, as a sort of respect for the locale. Internally, something similar happens. This is the reason I can work harder in Tokyo than I can in Hawaii. Japan in general, but Tokyo specifically, radiates of work and a focus on quality. On the bad end this could mean 80 hour work weeks and a certain stiffness. On the good side, this means being dedicated to the task and making it happen. For example, I was inspired last month when a company took a building garage in my neighborhood and turned it into a fully decked out shiny supermarket in just 2 weeks. I should be clear this effect is entirely personal and not meant to portray Berlin or Hawaii as lazy by any means – I have known great examples of people excelling there.

2. Market Data Ignorance
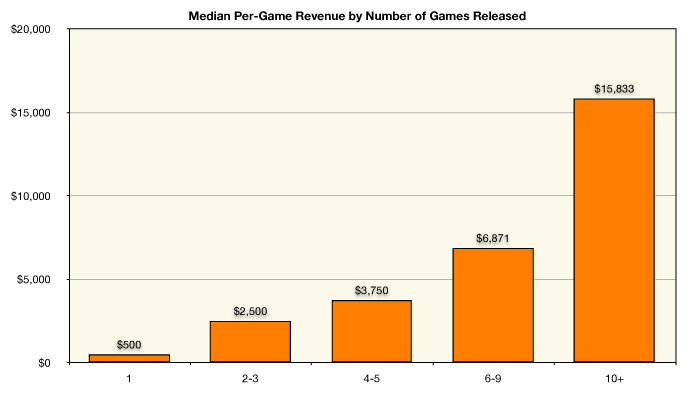
Graph from streamingcolour.comI’m budgeting such that I’m giving myself several years to turn this around, but the hope always seems to be that I’ll be able to break even pretty soon, but this is just residual newbie iOS dev folly lying around. About half a year ago there was a huge rush of media about the iOS market being a lottery, and that the gold rush was over. The later is certainly true, as you will see if you go to iphonedevsdk.com and read a bit of the forum posts about people who only sold 2 copies of their game.
The bit about it being a lottery is a unfair though, as I have to believe there is a strong correlation between quality and success in the app store. The thing is that ‘quality’ does not only include polish/functionality/look-and-feel, but also all the other fine points of the market. For example, a few weeks ago an app with casual game play called Gangnam Style Massacre hit the top of the charts, even though it was unaffiliated with the artist and wasn’t very fun according to most reviewers. Yes, bad games can be a hit for external reasons, but this has nothing in common with a lottery, which implies random selection. Not that I know much about marketing, but one of the things I have seen so far is that it is about making presentation clear and relevant as possible for your target.
On the other hand well polished games can be a bust. The most famous example I know in the iOS community is Gasketball, the devs of which spent three years living like college students, borrowing money from family and friends, only to release an app that would be downloaded much but not sell enough to break even. The guys at the walled garden weekly did a great analysis of why it didn’t work in the iOS market. Actually, I should point out although the forum is a casual beer drinking chat podcast, the walled garden weekly podcast, done by the developers of Zombie Gunship and Zombie Highway, is probably the and most legit and informative resource for iOS marketing I’ve seen so far on the web. There are many other iOS podcasts out there that are also worth looking at.
Some polished games are success right of the bat. Some of these, like the developers for S.Q.U.I.D.S. write great writeups specifically for helping other indies. This is not an altruistic move of course – but indie devs are starting to realize with things like cross promotion, that we are not in the kind of kill or be killed competition, as some marketing techniques such as cross promotion have shown.
If you just want to test the water and put together a 2 day app you obviously don’t need to spend a week doing market research. But if you plan to continue it’s definitely worth spending some time on this. I regret putting this off for too long. So that this won’t be too depressing here’s some good data. Streaming Color did a survey of iOS devs that showed although the first apps released by a single developer didn’t do very good on average, the median per game rises sharply after the first few are developed. So there is at least some encouraging data that provides incentive to keep going.

3. Market Competition Ignorance

Ostrich Devs Make Weather App

I have to admit I have a natural naivety that exhibits itself as a tendency to ignore things that I don’t understand. This is a vicious cycle that is particularly dangerous when you are working independently, since you have less external input to force you to break out of it. Some of this is a weird and unhealthy jealousy that just makes me never want to touch the angry birds icon because it will somehow help Rovio – although logically I know how ridiculous this sounds, there’s just this part of me that doesn’t want to see this. Another part of it is also insecurity inspired- that seeing other people’s success can show you just how much you are lacking. However, I need to remind myself this is all complete trash that is just getting between myself and great examples of successful apps that can teach me about what is working for the market at this point in time. And to be able to see larger trends, I will need to play a large range of games. This gets me to the final channel of ignorance – avoiding games that I just don’t like as a gamer. Again, not relevant if the task is to learn about the market. It’s so important to get on there and download all the free popular games, as well as buying the relevant ones, and playing them for the very reason that your perspective and tastes as a gamer are limited.
I came to iOS from doing academic experimental music and research. In most creative arts, especially the more recent ones, when you make a piece the feedback mechanism is loose. It’s not clear if what you made was good or not, and in most cases there is nothing to buy. Both popular and monetary success are not as important. I could always say that I ‘don’t care because even if no one likes it this means something to me’ or ‘people will see in the future what I meant when the world is ready’. And this is totally acceptable. I think games are also an artform that just have a much much heavier commercial side to it. This means that the feedback loop is a lot clearer, and monetary and popular success is part of it. When your game flops you know immediately because you can tell from the graph that gets updated nightly that you still have to eat cup ramen this month (or learn how to cook fast and well :).
On the other hand, being able to tell when something didn’t work is a great way of checking your assumptions about the market. You can then spend time finding out why, and change it for the next time. Fortunately the expectation of iOS apps and games is that they are smaller worlds that take less dev time then their desktop counterparts. This means that agile development techniques can be used to test the waters and get a bunch of apps out quickly to try and triangulate your best heading. I should also mention that the hierarchical nature of software means that you should be able to reuse a lot of code for these apps, which also enormously speeds up the time it takes to develop a game after the first. At least that’s the basic strategy I’m going with.

4. Pressure

<100 yen lunch

Once I got the money and work part figured out it should be smooth sailing right? If only the brain worked that way. There are so many things to worry about.
For example, ironically, my lifestyle looks almost exactly like the Japanese social phenomena of the ‘neet’, ‘hikikomori’, and the ‘freeter’, which are somewhat derogatory terms for younger people who can’t or aren’t willing to work and perhaps sit around or spend all their time on games and 2ch. I program at my desk so I stay at home most of the day, occasionally going out to get cheap food, and don’t have much of a social circle. For some reason, although there are many web/graphic designers who work freelance, small software business/indie game development is much less popular in Japan than it is in the U.S., and at the scale I am doing it at it will seem like a hobby to many people rather than actual work. This gives me a certain amount of pressure. Or maybe I just need to get better at explaining what I do in Japanese.
The way to deal with this, I’ve found, is to realize that it is a valid source of stress, that I have no way to control. That might sound like despair, but somehow accepting it as just the way things are means I can avoid thinking about it and just do work instead.
If you haven’t checked it out, for those of you who managed to read to this point, you should watch the 2012 documentary Indie Game. It follows the trials and tribulations of three indie game developers that are well known. Sometimes it’s good to hear that others are going through the same mental struggles, because we grew up in a society that tells us we should be happy all the time, or there’s something wrong. This documentary reminds that sometimes there’s something right too.

5. Addictions
I used to smoke and watch lots of TV. Now I don’t smoke and I control the amount of TV I watch. But if I’m not careful I can spend half a day googling about fixing posture or flipping between reddit and other news. There are definitely periods of time where it is easy to work all day, but sometimes the motivation just isn’t there. It’s usually related to feeling stressed about something, or not having clear direction for the next step of the development. However, no amount of planning or horse-blinds will change the fact that sometimes I try to avoid work by going to these automatic activities that I don’t even really enjoy. Find out what they are and turn them into signals for when you should take a second look at your plan – I find that making changes to the plan usually means I want to start implementing them right away. Set the amount of time you’re going to use for leisure aside, and stick to it. I try to remind myself this is only going to work if you can take it as seriously, and hopefully more seriously than the desk job. When all else fails I sometimes turn towards productivity hacks like the pomodoro technique. Usually I find once I start writing a bit of code I feel great and I don’t want to stop.

I was going to talk more about how what kind of food I eat and other trivial stuff but somehow this turned into a confessions of an unknown newbie indie game dev and is now multiple pages long. Since I’ve been consuming more resources from the indie game dev community I want to contribute some back though, and this is really all I can think to do right now. If only for a survey of resources or even just plain commiseration, I’m glad to write this kind of blog. I guess I’ll save the cheapo indie dev gourmet for next time.

30 Apr 12
16:20

iOS: encoding to AAC with the Extended Audio File Services gotchas

I recently implemented encoding to AAC from raw PCM in memory (as opposed to from a file) using the extended audio file services, which have their calls prefixed with ExtAudioFile*. ExtAudioFile stuff basically wraps a converter with the standard AudioFile functionality. It was a bit hard to track down the correct documentation, but it’s not that far off from using the regular AudioFile stuff you’d do when writing a WAV file, for instance.

Then, a few days later, AAC encoding suddenly stopped working, without my code changing at all. Debugging led me to find that this only happened on my iPhone 4S, and not my iPod or 3GS, nor the simulator. This problem existed with apps from other developers too, including the helpful Michael Tyson’s TPAAC converter project on github. I was getting a long amount of blocking (10-30 seconds) and then an error from sometimes ExtAudioFileSetProperty on the kExtAudioFileProperty_ClientDataFormat and if not that, the ExtAudioFileWrite call. I have no clue why sometimes the ExtAudioFileSetProperty would go through. In all cases though, the audio on my app was dead after this call failed until I restarted the app. This made me think it was something to do with AudioSessions (as Michael Tyson points out can cause issues), but turns out this wasn’t the case for me. FYI my OSError code was 268451843, which doesn’t even translate to anything in core audio.

After reverting to swearing at the docs that are the notorious API documentation, and exploring various dead ends such as modifying my interrupt handler for the AudioService as well as trying it on the main thread just in case there was some race case issue, I came across this life saving stack overflow post by a mystery user1021430 who I am feeling very fond for (since he has an ambiguous handle I can imagine what I want). His post mentioned that it seems for certain dual core devices like the 4S, the hardware encoder is finicky, and it is possible to switch to a software encoder to fix these issues. I had no clue about this from the docs, and really think this guy that posted the answer probably has the most undervalued reputation (1).

Anyway, here’s my finalized (and unpolished, including progressbar updates that you should remove to use) code that exports to aac from a buffer. The FilterSound and FilterAudioBuffer classes are ommited, but it basically just helps fill out a buffer and shouldn’t be hard to understand.


-(BOOL)saveAACFileWithSound:(FilterSound*)s filename:(NSString*)filename progressView:(UIProgressView*)progView
{
   OSStatus err = noErr;

   NSString *path = [self pathForAudioFileWithFilename:filename];
   NSURL *url = [NSURL fileURLWithPath:path];

   char errCode[5];

   uint64_t doneSamples = 0;
   uint64_t totalSamples = [s approxTotalSamples];   
   
   AudioStreamBasicDescription format;
   ExtAudioFileRef outFile;
   memset(&format, 0, sizeof(format));

   format.mFormatID = kAudioFormatMPEG4AAC;
   //format.mFormatFlags =  kMPEG4Object_AAC_Main;
   //format.mSampleRate = kFilterSampleRate; // the encoder for compressed formats uses a different sample rate (see docs)
   format.mChannelsPerFrame = 2;
   
   err = ExtAudioFileCreateWithURL((CFURLRef)url,
                                kAudioFileM4AType,
                                &format,
                                   NULL,
                                kAudioFileFlags_EraseFile,
                                &outFile);

   if (err != noErr) {
      strncpy(errCode,(const char*) &err, 4);
      errCode[4] = 0;
      
      NSLog(@"AudioFileCreateWithURL path=%@ Error %li = %s", path, err, errCode);

      return NO;
   }

   // sometimes the dual core devices like iPhone 4S will freak out on the next set property call unless you do this.
   // What's more the device will be broken.
   // No idea why this is.
   UInt32 codecManf = kAppleSoftwareAudioCodecManufacturer;
   ExtAudioFileSetProperty(outFile, kExtAudioFileProperty_CodecManufacturer, sizeof(UInt32), &codecManf);

   // setup the client format since we want to convert from PCM
   AudioStreamBasicDescription clientFormat;
   memset(&clientFormat, 0, sizeof(format));

   clientFormat.mFormatID = kAudioFormatLinearPCM;
   // WAV should be little endian
   clientFormat.mFormatFlags =  kLinearPCMFormatFlagIsSignedInteger | 
         kLinearPCMFormatFlagIsPacked;//~kAudioFormatFlagIsBigEndian;
   clientFormat.mSampleRate = kFilterSampleRate;
   clientFormat.mBitsPerChannel = sizeof(AudioSampleType) * 8; // AudioSampleType == 16 bit signed ints
   clientFormat.mChannelsPerFrame = 2;
   clientFormat.mFramesPerPacket = 1;
   clientFormat.mBytesPerFrame = (clientFormat.mBitsPerChannel / 8) * clientFormat.mChannelsPerFrame;
   clientFormat.mBytesPerPacket = clientFormat.mBytesPerFrame * clientFormat.mFramesPerPacket;
   
   err = ExtAudioFileSetProperty(outFile, kExtAudioFileProperty_ClientDataFormat, sizeof(clientFormat), &clientFormat);
   if (err != noErr){
      NSLog(@"ExtAudioFileSetProperty error %li", err);
      return NO;
   }
   
   size_t outNumPackets = 0;
   size_t numBytes = 0;

   FilterAudioBuffer* audio_buf;
   audio_buf = [[FilterAudioBuffer alloc] initWithChannels:2
                                                    frames:kSaveWavBufferSamples
                                                shouldZero:NO];

   AudioBufferList writeBuffer;
   while (![s shouldBeRemoved]) {
      // we use the same buffer each iteration, so we need to wipe it clean.
      memset(audio_buf->buffer, 0, sizeof(SInt16) * 2 * kSaveWavBufferSamples);
      // have the sound object fill out the next sound
      // for this function the term 'packet' is a frame for uncompressed formats.
      // fortunately writeToBuffer returns the number of frames written
      // (This can be shorter for buffer playback at the end when the sound size doesnt
      // divide evenly into kSaveWavBufferSamples
      outNumPackets = [s writeToBuffer:(SInt16*)audio_buf->buffer samples:kSaveWavBufferSamples];
      numBytes = outNumPackets * sizeof(SInt16) * 2;

      writeBuffer.mNumberBuffers = 1;
      writeBuffer.mBuffers[0].mNumberChannels = clientFormat.mChannelsPerFrame;
      writeBuffer.mBuffers[0].mDataByteSize = numBytes;
      writeBuffer.mBuffers[0].mData = audio_buf->buffer;

      err = ExtAudioFileWrite(outFile, outNumPackets, &writeBuffer);

      doneSamples += outNumPackets;
      float prog;
      prog = doneSamples / ((float) totalSamples);
      [self performSelectorOnMainThread:@selector(updateProgress:)
                             withObject:[NSArray arrayWithObjects:[NSNumber numberWithFloat:prog],
                                                 progView, nil]
                          waitUntilDone:NO];
      if (err != noErr){
         NSLog(@"AudioFileWritePackets error %li", err);
         break;
      }
   }
   [audio_buf release];
   ExtAudioFileDispose(outFile);
   return err == noErr;
}