31
Mar 13
21:39
Cocos2D-X: Creating an iOS/android dual-platform project
 I develop iOS apps. However, the first smartphone I had was an android device. I like open-source projects and bought it over the iPhone for idealogical reasons more than anything else. As a user, the android experience was okay, although iOS clearly had the apps and the polish. But when it came down to actually needing to make a surviving wage I decided to switch to iOS.
Lately, in podcast and forums, as well as third-party developer support tools, I’ve seen a comeback in indie iOS game developer interest for android, for whatever of the many reasons there might be from iOS over-saturation to app store visibility to the rising android markets. Especially for games. Some people are porting their obj-c projects to java. Some people are developing in Unity for the ability to deploy to both platforms. Unity seems to be great in that regard, but although free for PC/Mac deployment, it can cost a bit to deploy on iOS/Android at $400 a platform. Then there are the open-source “write once, run everywhere” solutions, for games such as libgdx and cocos2d-x. This is ironic because the slogan is from sun, but due to the walled garden nature of the walled garden, the term applies better to cocos2dx client code then the android java sdk.
cocos2d-x client code is in c++, which is my native tongue. Sweet. I had also played around a bit with cocos2d in obj-c and it was okay. So I decided to give cocos2d-x a shot to give android a second chance. Also you can supposedly deploy to windows 8 mobile and get $100 (note to self:not sure if joking).
Until recently I was one of the active contributors of Audacity, which is built using wxWidgets. For my last few sonfication/noisemaker projects I used Open Frameworks. wxWidgets and Open Frameworks are great because they let you write c++ code once and deploy on mac/windows/linux. But setting up the first project to work with each platform is a pretty big barrier for pretty much every cross-platform framework. This is just the nature of the beast – namely the inherent complexity of cross platform development.
There are a few guides out there on setting up your build for cocos2d-x for iOS and android. There are great guides, but they are about a year old, and so they didn’t work without modification, although they do get you most of the way. The main place to look was the ever-present raywenderlich.com’s cocos2d-x tutorial and it’s prerequisite eclipse/android tutorial. Then there was gamit.ro’s cocos2d-x tutorial, which leaves out the eclipse details but goes into some important stuff about android makefiles that raywnderlich.com’s doesn’t. Lance Gray from the cocos2d-x forums also mentioned there’s a nice guide at paralaxer.com that shows how to integrate iOS/android plus win. Anyway, I’m writing this as a supplement to those guides, and as a thanks to their authors as well as the various forum posts that allowed me to get the solutions faster than I could on my own.
In all, I think it took me about a day and some change to get everything set up the way I wanted it, even with these guides. All of the waiting had to deal with the install and setup of cocos2d-x’s android project setup, OpenGL ES 2.0, and trying to use a shared project directory external to the cocos2d-x root for source control management reasons. That being said, if you just want to try it and already have XCode working with iOS, you can easily follow the guides to get your cocos2d-x project setup in minutes. I’ll try to describe what I stumbled on, and maybe it can save you some time.
update – Instead of doing all of the 10 steps listed below, you should check out this python script that creates a shared project directory for ios/android/mac/win.
The script came out recently so I didn’t hear about it, but it should save a lot of time. You’ll still need to install android ndk/sdk, set up the environment variables, as well as the emulator trick I mentioned, but it’ll save you steps 6-10, and the necessary merging of the projects that I don’t cover yet. The script is at tools/project-creator/create_project.py, in the cocos2d-x root. The script is very simple, and creates all the projects in one line – Although I had the NDK_ROOT missing error I describe below. You can still use this guide – steps 1, 3, 4, 5 are still what you need to do for android sdk installation, and the rest might be handy for debugging errors.
0. Assumptions
I started with XCode/iOS environment already set up, so I’m not covering that. You should be able to run an app in the iOS simulator before starting here.
1. Get Cocos2D-X
You can download the latest stable (2.1.2 as of march 31) from their website. I should also note that alternatively, they also have a github repo that has the stable releases tagged. I forked this on my own github account so I can make changes and submit them. After cloning your fork you can checkout the stable tag). If you don’t know what I’m talking about it’s best to just use the website zip download.
The zip extracts to a directory named cocos2d-2.1rc0-x-2.1.2 (if you used github it defaults to cocos2d-x). Put this somewhere. I put it in my source control management folder (e.g. /Users/mchinen/scm/cocos2d-x). The location of this folder will be used in the future many times, referred to as the cocos2d-x root or as the variable $COCOS2DX_ROOT.
2. Set up Cocos2D-X to work with XCode
Go to the terminal, and cd to the cocos2d-x root and run install-templates-xcode.sh. Example
cd ~/scm/cocos2d-x
sudo ./install-templates-xcode.sh
This will install some xcode templates.
2.1 Test the XCode template
Open XCode and go to the File Menu’s create new project. I wanted to use the chipmunk physics engine so I picked cocos2dx_chipmunk. You can pick the standard cocos2dx or box2d if you like, but just remember when you create your android project you will need to create the same type of physics engine.
I called my project ‘pet’ and put it at ~/scm/pet.
I was able to build and run in the simulator without any problems. I will note that there about 7 deprecated function warnings. Since I picked chipmunk it creates a scene which spawn lovely bald dancer sprite rigid bodies.
So that’s it for iOS setup, really. You now can modify and add cpp files as you like.
As I mentioned, the iOS setup is fairly painless. 95% of my time was spent on integrating android over the next few steps.
3. Eclipse setup
The (non cocos2d-x) android/eclipse raywenderlich.com tutorial I mentioned is a bit dated, and you only need one step from it for eclipse set up now in a bundle. Download the android sdk, which now includes eclipse+ADT plugin. There are also ways to expand an existing eclipse install (basically this follows the raywenderlich tutorial), but you can also just have two installs of eclipse (I have three installs of XCode on my computer).
The download comes as a zip and I extracted it to a folder in my home directory I use for non source control frameworks called ‘localframeworks’. So for me, the path to the android sdk bundle is /Users/mchinen/localframeworks/adt-bundle-mac-x86_64-20130219. If you ls it you’ll see it has two directories, one for eclipse, which contains the actual eclipse executable + adt, and another directory called ‘sdk’. When referring to the android sdk root, it’s this sdk directory, and not the parent. I suspect if you download the non-bundled (minus eclipse) version the directory structure is one less, with the sdk sitting on the top level.
4. Install C++ for eclipse
Go ahead and open the Eclipse application in the eclipse directory of the android sdk bundle.
If you are new to eclipse it will ask you about a workspace location. You can pick any user location for this – it won’t really affect the tutorial and does not determine the root directory of your android project. For example, I selected ~/localcode/. The default in ~/Documents is fine too.
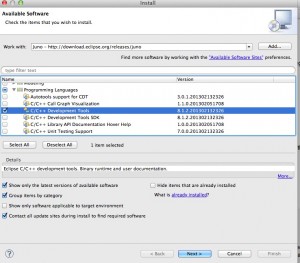
Now once eclipse loads go to the help menu, and select install new software. Select ‘Juno’ (or whatever the current build name of eclipse is), and then check C/C++ development tools. Click next and install it. FWIW my screen didn’t match the raywenderlich tutorial, and had one less item installed. Here’s a screenshot:
5. Install the android NDK
Download it (you want the 64 bit one). I extracted it and put it in the same localframeworks directory that I put the android SDK in. So the location of android NDK for me is /Users/mchinen/localframeworks/android-ndk-r8e. This will be referred to as $NDK_ROOT in the future.
6. Create the android project
Remember how the XCode project had templates that would configure and create the xcode cocos2d-x project for you automatically? It’s likely that some kind soul will make them some day but for now that doesn’t exist for eclipse yet. Fortunately for you, there is a (command-line) shell script that can do this. It’s called create-android-project.sh and it’s in $COCOS2DX_ROOT.
Remember how you could pick wherever you wanted to place the objective-C project? You don’t have that choice anymore either. To use the script, you need to cd to $COCOS2DX_ROOT and run the script there – calling it externally yields an error. This is not ideal if you want to use source control management like git, but we can fix this later at the cost of some minor pain.
First, you need to create some shell environment variables that the script uses. You can run these directly in the terminal and the variables will exist for the terminal session, but I like to put them (append them) in ~/.bash_profile.
export ANDROID_NDK_ROOT=~/localframeworks/android-ndk-r8e
export COCOS2DX_ROOT=~/scm/cocos2d-x/
export NDK_ROOT=$ANDROID_NDK_ROOT
export ANDROID_SDK_ROOT=~/localframeworks/adt-bundle-mac-x86_64-20130219/sdk
export PATH=$PATH:$ANDROID_NDK_ROOT
Now that you have the shell variables set, we’re ready to run the script. The usage of the shell script is
./create-android-project.sh [-b|--box2d] [-c|--chipmunk] [-l|--lua]
So to create an android project that links to the chipmunk framework, you should append the -c flag.
You’ll be prompted for a few things like your package path (you can use your intended iOS bundle. For example, ‘com.michaelchinen.pet’). Pick a target SDK which is (I used 2.2), and then lastly choose the name of your project (I used ‘pet’.
For completeness, this is my truncated output example from the script:
mcair:cocos2d-x mchinen$ ./create-android-project.sh -c
use global definition of NDK_ROOT: /Users/mchinen/localframeworks/android-ndk-r8e
use global definition of ANDROID_SDK_ROOT: /Users/mchinen/localframeworks/adt-bundle-mac-x86_64-20130219/sdk
using chipmunk
Input package path. For example: org.cocos2dx.example
com.roughsoft.pet
Now cocos2d-x supports Android 2.2 or upper version
Available Android targets:
----------
id: 1 or "android-7"
     Name: Android 2.1
     Type: Platform
     API level: 7
     Revision: 3
     Skins: HVGA, QVGA, WQVGA400, WQVGA432, WVGA800 (default), WVGA854
     ABIs : armeabi
----------
id: 2 or "android-8"
     Name: Android 2.2
     Type: Platform
     API level: 8
     Revision: 3
     Skins: HVGA, QVGA, WQVGA400, WQVGA432, WVGA800 (default), WVGA854
     ABIs : armeabi
----------
id: 3 or "android-10"
     Name: Android 2.3.3
     Type: Platform
     API level: 10
     Revision: 2
     Skins: HVGA, QVGA, WQVGA400, WQVGA432, WVGA800 (default), WVGA854
     ABIs : armeabi, x86
----------
[...]
id: 13 or "android-17"
     Name: Android 4.2.2
     Type: Platform
     API level: 17
     Revision: 2
     Skins: HVGA, QVGA, WQVGA400, WQVGA432, WSVGA, WVGA800 (default), WVGA854, WXGA720, WXGA800, WXGA800-7in
     ABIs : armeabi-v7a
input target id:
2
input your project name:
pet
Created project directory: /Users/mchinen/scm/cocos2d-x/pet/proj.android
Created directory /Users/mchinen/scm/cocos2d-x/pet/proj.android/src/com/roughsoft/pet
Added file /Users/mchinen/scm/cocos2d-x/pet/proj.android/src/com/roughsoft/pet/pet.java
Created directory /Users/mchinen/scm/cocos2d-x/pet/proj.android/res
Created directory /Users/mchinen/scm/cocos2d-x/pet/proj.android/bin
Created directory /Users/mchinen/scm/cocos2d-x/pet/proj.android/libs
Created directory /Users/mchinen/scm/cocos2d-x/pet/proj.android/res/values
Added file /Users/mchinen/scm/cocos2d-x/pet/proj.android/res/values/strings.xml
Created directory /Users/mchinen/scm/cocos2d-x/pet/proj.android/res/layout
Added file /Users/mchinen/scm/cocos2d-x/pet/proj.android/res/layout/main.xml
Added file /Users/mchinen/scm/cocos2d-x/pet/proj.android/AndroidManifest.xml
Added file /Users/mchinen/scm/cocos2d-x/pet/proj.android/build.xml
Added file /Users/mchinen/scm/cocos2d-x/pet/proj.android/proguard-project.txt
Resolved location of library project to: /Users/mchinen/scm/cocos2d-x/cocos2dx/platform/android/java
Updated project.properties
Updated local.properties
Updated file /Users/mchinen/scm/cocos2d-x/pet/proj.android/proguard-project.txt
This then creates a directory called pet within the cocos2d-x directory. If you open it you should see another directory called pet, as well as a very important directory called proj.android. This directory is kind of like your xcodeproj file, except it contains a lot more things including build output.
7. Build the android project.
If you cd to the proj.android directory, you can then build the project by running the build_native.sh script:
Here’s what I got (middle truncated, again)
cd ~/scm/cocos2d-x/pet/proj.android
./build_native.sh

NDK_ROOT = /Users/mchinen/localframeworks/android-ndk-r8e
COCOS2DX_ROOT = /Users/mchinen/scm/cocos2d-x/pet/proj.android/../..
APP_ROOT = /Users/mchinen/scm/cocos2d-x/pet/proj.android/..
APP_ANDROID_ROOT = /Users/mchinen/scm/cocos2d-x/pet/proj.android
Using prebuilt externals
make: Entering directory `/Users/mchinen/scm/cocos2d-x/pet/proj.android'
Compile++ thumb  : game_shared <= main.cpp
Compile++ thumb  : game_shared <= AppDelegate.cpp
Compile++ thumb  : game_shared <= HelloWorldScene.cpp
[...]
StaticLibrary  : libchipmunk.a
Compile thumb  : cpufeatures <= cpu-features.c
StaticLibrary  : libcpufeatures.a
SharedLibrary  : libgame.so
Install        : libgame.so => libs/armeabi/libgame.so
make: Leaving directory `/Users/mchinen/scm/cocos2d-x/pet/proj.android'
So at the end you can verify that chipmunk is being included in the build.
Great.
We’re ready to use this project in eclipse.
8. Configuring the eclipse project
Go to Eclipse’s File Menu->New->Project.
Then select Android Project from Existing Source in the next dialog.
After that you will be prompted to point to the existing source.
You want to point to the proj.android directory as in this screenshot.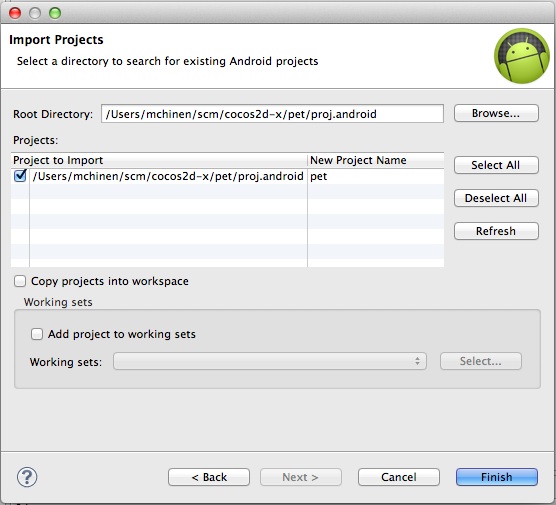
After this pick an android target in the next dialog. I chose 2.2.
This creates a project in eclipse. Unfortunately, mine had errors that said “Cocos2dxActivity could not resolve to a type”.
I’m not sure what the best solution is, but here’s what I did. We need to get the Cocos2dxActivity stuff into our workspace, but stay outside of the pet project. So go to File->Import… and pick “Android->Existing Project into workspace”. Then choose the directory at $COCOS2DX_ROOT/cocos2dx/platform/android/java.
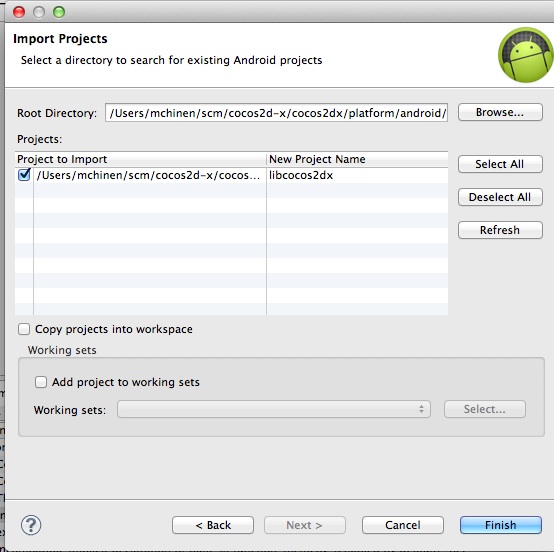
Now you have two projects in your workspace, pet, and the cocos2dx java libs in a project called libcocos2dx. You need to add a reference so the pet project knows to look at the cocos2dx java files. To do this, right click on the pet folder in the package explorer in eclipse, and select Properties. Then go to Java Build Path->Projects->Add… and select the libcocos2dx. This should fix the errors in the pet project, meaning that you’re ready to build and run on a device.
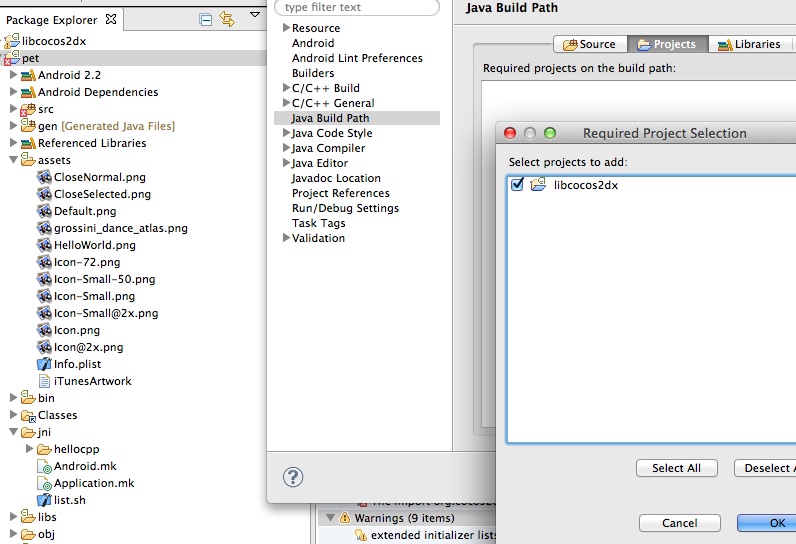
Note – You can fix this error by using the ‘link source folder’ option instead, and it will work, but I think this incorrect – please comment if you know for sure.
So you’re ready to run. At this point using cocos2dx 2.1.2, you still can’t run in the emulator because there are issues with OpenGL ES 2.0. But if you have a device that supports it, you should be good to run after hitting the play button and selecting the device. I busted out my 4 year old HTC Hero, flashed to android 2.3, and was hoping for something, but it just doesn’t support ES 2.0. Also, as important as it is to test on the device, the emulator can be a good way to get an idea of how your game deals with whatever resolutions you don’t have devices for. So I had to get the simulator working.
This thread describes how to do it. So if you need emulator support, you need to edit one of the java files in the libcocos2dx project. The patch code on the forum is missing some includes, so here’s the diff from my github that shows how to modify the file.
The file you need to edit is cocos2dx/platform/android/java/src/org/cocos2dx/lib/Cocos2dxActivity.java
@@ -27,9 +27,11 @@
 import android.app.Activity;
 import android.content.Context;
+import android.os.Build;
 import android.os.Bundle;
 import android.os.Message;
 import android.view.ViewGroup;
+import android.util.Log;
 import android.widget.FrameLayout;

 public abstract class Cocos2dxActivity extends Activity implements Cocos2dxHelperListener {
@@ -139,6 +141,10 @@ public void init() {
         // ...add to FrameLayout
         framelayout.addView(this.mGLSurfaceView);

+        // Switch to supported OpenGL (ARGB888) mode on emulator
+        if (isAndroidEmulator())
+           this.mGLSurfaceView.setEGLConfigChooser(8 , 8, 8, 8, 16, 0);
+
         this.mGLSurfaceView.setCocos2dxRenderer(new Cocos2dxRenderer());
         this.mGLSurfaceView.setCocos2dxEditText(edittext);

@@ -150,6 +156,19 @@ public Cocos2dxGLSurfaceView onCreateView() {
       return new Cocos2dxGLSurfaceView(this);
     }

+   private final static boolean isAndroidEmulator() {
+      String model = Build.MODEL;
+      Log.d(TAG, "model=" + model);
+      String product = Build.PRODUCT;
+      Log.d(TAG, "product=" + product);
+      boolean isEmulator = false;
+      if (product != null) {
+         isEmulator = product.equals("sdk") || product.contains("_sdk") || product.contains("sdk_");
+      }
+      Log.d(TAG, "isEmulator=" + isEmulator);
+      return isEmulator;
+   }
+
   // ===========================================================
   // Inner and Anonymous Classes
   // ===========================================================
After that, you’re almost there. Open the android device manager in the window menu of eclipse.
Click New…, then create a device. I created a galaxy s3 on 4.0. The main thing is you click the use host GPU button. Without this, the app would just crash. Here’s what my device config looks like:
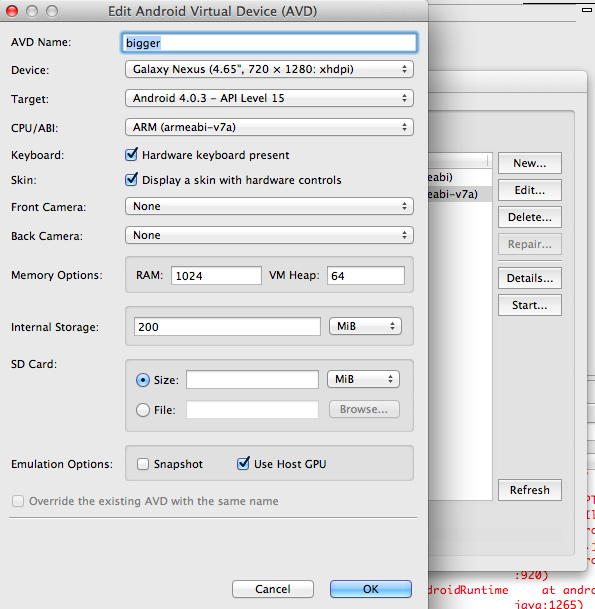
After setting this, run, and you should see a cocos2d logo and fps. Note that it isn’t the same as the iOS one, but at least something is on the screen and not crashing.

9. Convert to C++ Project
What remains to be done is to convert the android project to C++ for convenience, and then to merge it into the iOS project. You don’t really need to convert it, since you already have a running application, but this will make it so you can stay in eclipse and don’t need to switch to the terminal to build the C++ each time you make a change.
Ok, honesty time. It’s been a few hours since I started writing and I’m getting lazy now, so you can follow the raywenderlich.com guide to convert to C++, but I will note I hit an error after creating the C++ project where building would fail with a “Please define NDK_ROOT”
Here’s how to do that:
right click on the project->Properties->C/C++ Build->New variable.
For the name use NDK_ROOT. For the value use ${HOME}/localframeworks/android-ndk-r8e
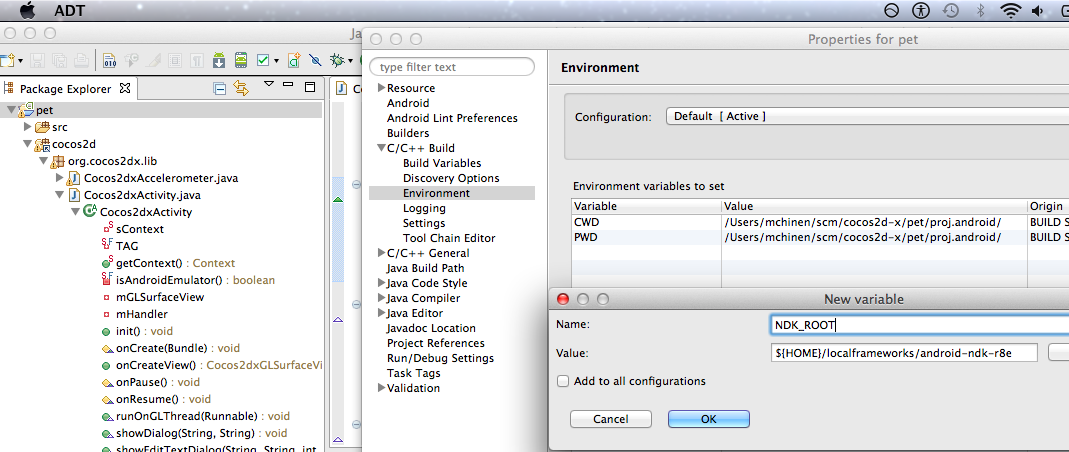
And all should build and run again.
10. There is no 10
After that you can follow the other tutorials on how to merge the projects. I’ll note that the raywenderlich one doesn’t actually fix the issue of having two unrelated directories, with the android one inside of the cocos2d-x directory.
I fixed this using a different method so that I could have both projects in one directory. Originally I planned to include that as well, but my time spent on blogposts is more than up, but maybe if there’s interest I’ll post another update on this. For now I need to get back to actually using the framework!
One other note that

sumit kher
April 2, 2013
5:16 am
This is very inspiring, as getting from the start & Having no real background in programming (aside from making some adventures on ZX-81 and MSX), I want to get started on developing something for my own Android based eBook reader and android app development training and know that if you are android apps developer who wants to design and develop android-based apps you must go through the design guidelines set by the official Android user experience UX team. Even this online course seems to be interesting http://www.wiziq.com/course/13599-professional-android-app-development-training-1-on-1-sessions. Has anyone tried any online courses so far. Please do provide a light on this also.
Csocso
April 30, 2013
9:46 pm
HY !
This was very helpful to me ! THX !
I’m trying to make a cross platform game (android-ios) and im stuck…
I was able to run the project in ios, i made a new project for Android as well, but when i’m trying to merge them all i get back is the original android Cocos2d projet not that i wrote in Xcode…
Can you help me pls 🙂 THX !
Zenithkicker
May 28, 2013
8:31 pm
Great Tutorial! I have one issue though. I keep getting “Error accepting connection” after trying to run in the emulator. Any ideas as to what to do? -Thx
sdabet
June 6, 2013
9:22 am
Very interesting post! Just wanted to mention CocosBuilder and JS bindings which also provide an interesting solution for multiplatform development with cocos2d. Check this out for more details: http://2sa-studio.blogspot.fr/2013/04/setup-cross-platform-project-with.html.
Thanks
akuba
June 21, 2013
8:38 am
You use cygwin for it?
gr33ng33k
August 15, 2013
9:55 am
Nice descriptive post. I would like to see your step 10. So that it will easy for version control